Introduction
In the digital age, safeguarding your digital assets has never been more critical. Static passwords, especially when reused across multiple platforms, present a significant security risk. This blog post delves into how Azure Key Vault and automated password rotation can drastically reduce this risk, securing your environment against potential threats.
The Perils of Static Passwords
The use of a single password across your environment can significantly amplify the risk of cyber attacks. This practice not only increases your attack surface but also simplifies the job for cyber attackers, making it easier for them to compromise your systems.
Overview: Setting the Stage for Security
To embark on enhancing your security with automated password rotation, you’ll need the following Azure components:
- Virtual Machine: For demonstration, a Windows 2019 VM deployed in Azure.
- Azure Key Vault: Acts as the secure vault for your automated password secrets.
- Automation Account: Hosts the runbook that will manage the password update process.
I’ll skip the details of setting up a virtual machine, assuming everyone is familiar with this process.
Azure Key Vault: Centralizing Digital Security
Azure Key Vault stands out as a pivotal tool in managing and securing digital secrets, including passwords. It centralizes the management of secret keys, reducing the chances of unauthorized access and exposure.
Setting Up Azure Key Vault
- Navigate to the Azure Portal: Log in to your account.
- Create a Key Vault: Search for “Key Vault” in the marketplace and fill in the necessary details like name, region, and resource group.
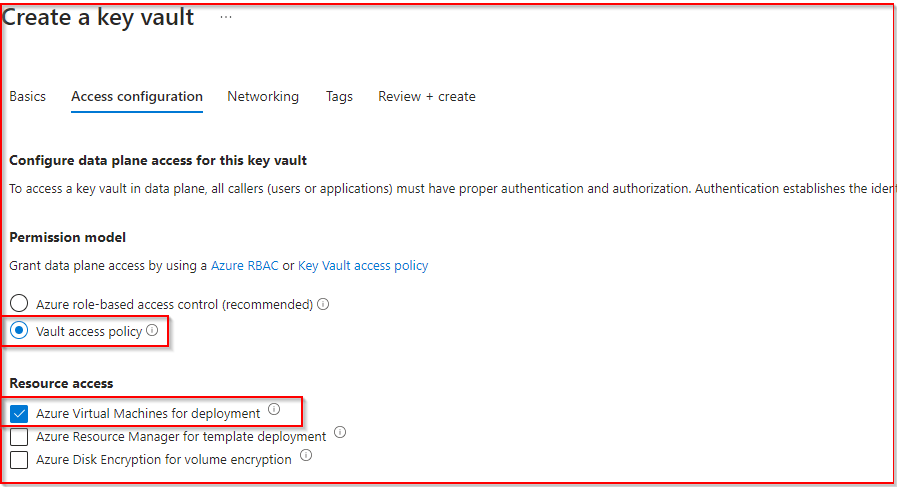
- Access Configuration: Under permissions, select “Vault Access Policy.” For Resource Access, choose “Azure Virtual Machines for deployment.”
- Managing Secrets: After creation, go to the “Secrets” section. Click “+ Generate/Import” to create a secret for the VM password. Add both a name and the secret value.

Automating Password Rotation: A Step-by-Step Guide
Automated password rotation is crucial for maintaining security, particularly for sensitive roles. Below is a PowerShell script tailored for Azure environments to automate this process, utilizing Azure Key Vault for secure password management.
Configuring Azure Automation
- Create an Automation Account: In the Azure Portal, create a new Automation Account, specifying the same subscription and, optionally, the same resource group as your Key Vault.
- Advanced: Under the advanced section ensure “System Assigned” identities is ticked, complete the creation of the Automation Account.
- Import Necessary Modules: Your Automation Account needs specific modules to interact with VMs and Key Vault. Ensure you import
Az.Accounts,Az.Compute, andAz.KeyVaultmodules. Navigate to your Automation Account, select “Modules” under “Shared Resources”, and add these modules if they’re not already present.
Setting Permissions and Preparing the Runbook
After configuring the essential components, it’s crucial to establish the correct permissions to ensure secure and seamless operation between your Azure services.
Assigning Necessary Permissions
- Virtual Machine Access: Grant the “Virtual Machine Contributor” role to the Automation Account which will allow it management capabilities over the virtual machine.
- Enabling Automation from VM: Within the Virtual Machine’s security settings, locate the “Identity” option. Assign the “Automation Contributor” role to the Virtual Machine itself, enabling it to interact efficiently with the Automation Account.
- Securing Key Vault Access: Go to your Azure Key Vault and access the “Access Policies” section. Here, you’ll add a new policy. Ensure it includes “Get,” “List,” and “Set” permissions for secrets, and assign this policy to your Automation Account. This step is pivotal in securing and managing access to the passwords stored within the Key Vault.
Crafting the Runbook
With permissions in place, the next action is to create a runbook within your Automation Account. This runbook will be the engine behind the automated password rotation, executing the necessary scripts to update and secure your environment.
- Initiate Runbook Creation: In the Automation Account dashboard, look for the option to create a new runbook. Click on this to start the setup.
- Configure Runbook Settings:
- Name: Assign a distinctive name to your runbook, making it easily identifiable.
- Runbook Type: Select “Powershell” as the type, aligning with the scripting language of our automation script.
- Runtime Version: Opt for the latest stable version, 7.2, to ensure compatibility and leverage the latest features.
- Description: Provide a brief yet descriptive summary of the runbook’s purpose and its role in the password rotation process.
Script for Automated Password Rotation
The new automated password will be a 16 character alphanumeric password contains numbers, letters, and special characters.
# Authenticate using Managed Identity
Connect-AzAccount -Identity

# Define variables for your environment
$resourceGroupName = "YourResourceGroupName" # Your VM's resource group
$vmName = "YourVMName"                       # Your VM's name
$vaultName = "YourKeyVaultName"              # Your Key Vault's name
$secretName = "YourSecretName"               # Your secret's name for storing the VM password
$location = "YourVMLocation"                 # Your VM's location
$username = "localadmin"                     # The VM's admin username (change if different)

# Function to generate a new password
function Generate-Password {
    param ([int]$length = 16)
    $characters = 'ABCDEFGHIJKLMNOPQRSTUVWXYZabcdefghijklmnopqrstuvwxyz0123456789!@#$%^&*()'
    $securePassword = New-Object System.Security.SecureString
    1..$length | ForEach-Object {
        $char = $characters[(Get-Random -Maximum $characters.Length)]
        $securePassword.AppendChar($char)
    }
    return $securePassword
}

# Generate a new password and convert it to plaintext for VM extension
$securePassword = Generate-Password
$plaintextPassword = [Runtime.InteropServices.Marshal]::PtrToStringAuto([Runtime.InteropServices.Marshal]::SecureStringToBSTR($securePassword))

# Update the VM's local administrator password
try {
    $protectedSettings = @{ "username" = $username; "password" = $plaintextPassword }
    Set-AzVMExtension -ResourceGroupName $resourceGroupName -VMName $vmName `
        -Location $location -Name 'VMAccessAgent' `
        -Publisher 'Microsoft.Compute' -ExtensionType 'VMAccessAgent' `
        -TypeHandlerVersion '2.4' -ProtectedSettings $protectedSettings
    Write-Output "VM Access Extension set successfully."
} catch {
    Write-Error "Failed to set VM Access Extension. Error: $_"
}

# Store the new password in Azure Key Vault
try {
    $secretValue = ConvertTo-SecureString -String $plaintextPassword -AsPlainText -Force
    Set-AzKeyVaultSecret -VaultName $vaultName -Name $secretName -SecretValue $secretValue
    Write-Output "Key Vault secret updated successfully."
} catch {
    Write-Error "
}
Ensure to replace the placeholder values with your actual environment details before running the script. This script automates the process of generating a secure password, updating the VM’s password, and securely storing the new password in Azure Key Vault.
Finalizing and Executing Your Automation Strategy
With your runbook configured and ready, the next steps involve saving your work, publishing the runbook, and initiating the password rotation process. These actions represent the culmination of your efforts to enhance your system’s security through automation.
Saving and Publishing the Runbook
- Save Your Work: After entering the script and configuring the runbook, ensure you save your progress. This action preserves the script for future adjustments or reviews.
- Publish the Runbook: Publishing makes your runbook active and ready for execution. This crucial step transitions your runbook from a draft to a live script capable of automating the password rotation process.
Executing the Runbook
- Run the Runbook: Initiate the runbook to start the automated password rotation. This process will generate a new password, apply it to your virtual machine, and update the Azure Key Vault with the new password secret.
Monitoring Execution and Outputs
Upon running the runbook, monitor its execution status. Successful completion will be indicated by a ‘Completed’ status, confirming the password rotation has been effectively carried out.
- Successful Execution: A ‘Completed’ status assures that the automated process has successfully updated the VM’s password and stored the new credential in Azure Key Vault without issues.
- Troubleshooting Failures: If you encounter a ‘Failed’ status, it may be necessary to revisit the script and check for any inaccuracies in the placeholder variables or configuration settings. Ensuring all specified values accurately reflect your Azure environment is critical for a successful automation process.

Automating for Consistency
For full automation and to ensure continuous security enhancement, you can schedule the runbook to run on a scheduled basis. This step allows you to automate the password rotation process completely, ensuring that your virtual machine’s password is regularly updated without manual intervention.
Retrieving Your Updated Password from Azure Key Vault
- Navigate to Azure Key Vault: First, log into your Azure Portal and go to the Azure Key Vault that you’ve used to store the secret (the password).
- Access the Secrets Section: Inside your Key Vault, locate and click on the “Secrets” section found on the panel. This section lists all the secrets that your Key Vault is managing.
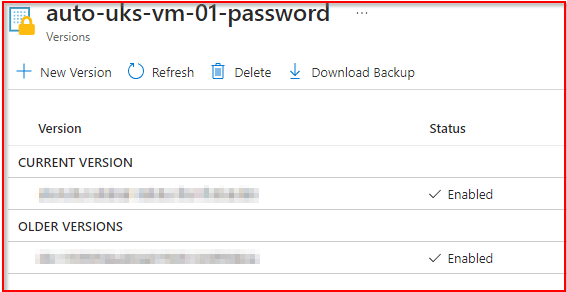
- Find Your Secret: Look for the secret name you designated for storing the VM’s password. This name was specified when you set up the Key Vault and the automation script.
- View the Secret Version: Click on the specific secret associated with your VM’s password. You may see multiple versions if the password has been rotated more than once. Each version corresponds to a password change, with the latest version representing the most current password.
- Show Secret Value: To view the password, select the latest version of the secret and then click on the “Show Secret Value” option. This action will reveal the password so that you can use it to access your VM or for other necessary purposes.

Conclusion: Elevating Security Through Automation
In an era where digital security breaches are not just probable but inevitable, taking proactive measures to safeguard our digital assets becomes paramount. Through the integration of Azure Key Vault and automated password rotation, we’ve explored a powerful strategy to enhance security infrastructure, making it more resilient against potential cyber threats. This approach not only mitigates the risk associated with static passwords but also aligns with best practices for identity and access management in the cloud.