What is Microsoft Defender for Endpoint?
It’s surprising how often I speak to businesses about endpoint security, and many still see Microsoft Defender as just a “built-in antivirus” that couldn’t be all that good. But in reality, Microsoft Defender for Endpoint is a feature-packed, enterprise-grade security solution that many organizations already have access to through their Microsoft 365 subscription—often without realizing its full potential.
In this blog, we’ll explore why Defender for Endpoint stands out as more than just antivirus software. We’ll break down its plans, capabilities, and features to give you a better understanding of how this tool can strengthen your organization’s security posture.
A Powerful Security Solution Across Devices
Microsoft Defender for Endpoint works across multiple platforms—Windows, macOS, Linux, Android, and iOS—leveraging advanced technologies like machine learning, behavioural analytics, and cloud intelligence to safeguard your environment from a range of cyber threats.
One standout feature is how Defender integrates with Microsoft Secure Score, offering a clear snapshot of your organization’s security health. Secure Score provides actionable recommendations to help you enhance protection. The higher your score, the more secure your business is.
Microsoft Defender for Endpoint: The Plans
Microsoft Defender for Endpoint comes in two main versions: Plan 1 (P1) and Plan 2 (P2), with a special Defender for Servers option if you’re protecting server infrastructure. If you need even more advanced features, you can also add the Defender Vulnerability Management Add-on.
Which Plans Are Included in Your Microsoft 365 Subscription?
- Microsoft 365 Business Standard: Doesn’t include any Defender for Endpoint features.
- Microsoft 365 Business Premium: Comes with Plan 1 (P1), giving you essential protection like antivirus, attack surface reduction, web content filtering, and tamper protection.
- Microsoft 365 E3: Comes with Plan 1 (P1), giving you essential protection like antivirus, attack surface reduction, web content filtering, and tamper protection.
- Microsoft 365 E5: Offers the full package with Plan 2 (P2), which includes advanced capabilities like Endpoint Detection and Response, Threat and Vulnerability Management, and automated investigation and remediation.
1. Plan 1 (P1)
P1 is the essential package and perfect if you’re looking for strong, reliable security. Here’s what you get:
- Next-Generation Protection: Built-in antivirus and anti-malware tools to protect you from new and known threats.
- Tamper Protection: Stops anyone from messing with your security settings, so key protections stay on.
- Attack Surface Reduction (ASR): Limits what apps, scripts, and macros can do, cutting down on risk from things like ransomware.
- Web Content Filtering: Blocks unsafe websites to reduce the chance of malware or phishing.

Tamper Protection: Why ITamper Protection: Why It Matters
One of the most valuable features of Microsoft Defender for Endpoint is Tamper Protection. It makes sure that critical security settings—like real-time antivirus scanning and cloud-delivered protection—can’t be changed by unauthorized users or malware.
Key benefits of Tamper Protection:
- Consistent Security: Keeps your security settings locked down, so they can’t be accidentally or maliciously altered.
- Stops Attacks from Disabling Protections: Protects against malware that tries to switch off your defenses like antivirus or firewalls.
- Peace of Mind: With Tamper Protection, you can rest easy knowing that your security setup stays as it should, with no surprises.
For example, if ransomware tries to disable your antivirus so malware can run, Tamper Protection steps in and blocks these changes, keeping your systems safe from potentially serious attacks.
2. Plan 2 (P2)
Plan 2 takes things up a notch, adding advanced tools for those who need extra protection:
- Endpoint Detection and Response (EDR): Real-time threat detection, investigations, and quick response to incidents.
- Device Isolation: Remotely isolate infected devices to prevent malware from spreading across the network.
- Automated Investigation and Remediation: Defender uses AI to investigate alerts and fix problems without needing manual intervention.
- Device Grouping & High-Priority Devices: Organize your devices for better management, and mark key devices (like exec laptops) as high priority to get faster responses to alerts.
- Threat and Vulnerability Management (TVM): Continuously scan for vulnerabilities and get recommendations for fixes, all tied into your Secure Score.

Defender for Servers: Protecting Your Server Environment
In addition to protecting personal devices like laptops and mobile phones, Microsoft Defender for Servers is specifically designed to secure your Windows and Linux servers. Servers often hold critical data, so it’s essential to keep them protected.
There are two plans for servers:
Defender for Servers Plan 1
Plan 1 offers solid protection for your servers with features like:
- Next-Generation Protection: Antivirus and anti-malware for detecting malicious activity.
- Attack Surface Reduction (ASR): Helps minimize attack opportunities by controlling risky behaviours.
- Integration with Azure Security Centre: Get a central dashboard to manage and secure your servers.
Defender for Servers Plan 2
Plan 2 takes things to the next level, giving you advanced tools like:
- Endpoint Detection and Response (EDR): Get real-time visibility and quickly respond to incidents on your servers.
- Threat and Vulnerability Management (TVM): Scan your servers for vulnerabilities and get actionable steps to fix them.
- File Integrity Monitoring (FIM): Track any unauthorized changes to critical system files.
- Just-in-Time (JIT) VM Access: Reduce the time window for accessing VMs, limiting the chance of unauthorized access.
https://learn.microsoft.com/en-us/azure/defender-for-cloud/plan-defender-for-servers-select-plan
Defender Vulnerability Management: Plans and Capabilities
Microsoft Defender for Endpoint also provides robust Vulnerability Management capabilities through the Defender Vulnerability Management Add-on. It ensures continuous detection and mitigation of vulnerabilities in your devices and servers. Here’s a breakdown of what each plan offers:
| Capability | Defender for Endpoint Plan 2 (Core TVM Features) | Defender Vulnerability Management Add-on (Premium) | Defender Vulnerability Management Standalone (for any EDR) |
|---|---|---|---|
| Device discovery | ✔ | – | ✔ |
| Device inventory | ✔ | – | ✔ |
| Vulnerability assessment | ✔ | – | ✔ |
| Configuration assessment | ✔ | – | ✔ |
| Risk-based prioritization | ✔ | – | ✔ |
| Remediation tracking | ✔ | – | ✔ |
| Continuous monitoring | ✔ | – | ✔ |
| Software inventory | ✔ | – | ✔ |
| Software usage insights | ✔ | – | ✔ |
| Security baselines assessment | – | ✔ | ✔ |
| Block vulnerable applications | – | ✔ | ✔ |
| Browser extensions assessment | – | ✔ | ✔ |
| Digital certificate assessment | – | ✔ | ✔ |
| Network share analysis | – | ✔ | ✔ |
| Hardware and firmware assessment | – | ✔ | ✔ |
| Authenticated scan for Windows | – | ✔ | ✔ |

https://learn.microsoft.com/en-us/defender-vulnerability-management/tvm-browser-extensions
Why Many Customers Aren’t Fully Using Microsoft Defender for Endpoint
Despite Microsoft Defender for Endpoint consistently being recognized as a leader in the Gartner Magic Quadrant for the past five years, I’ve found that many customers don’t take full advantage of all the features it offers.
Microsoft Defender for Endpoint does so much more than just act as an antivirus. It’s packed with powerful tools like real-time threat detection, automated remediation, and vulnerability management. Despite all this, a lot of organizations still treat it as basic antivirus protection and miss out on everything it offers.
By leveraging all the features mentioned in this blog, businesses can take their security to the next level. Whether it’s better organizing devices, securing your network, or monitoring threats in real time, using these tools helps create a solid, proactive security strategy. That’s what makes Defender for Endpoint a true game-changer for companies today

Key Features Across All Plans
Here’s a closer look at some of the top features available across the different Defender for Endpoint plans:
1. Attack Surface Reduction (ASR)
ASR helps reduce the number of ways attackers can get into your system by controlling how apps, scripts, and macros interact. This is particularly useful for stopping things like ransomware or fileless malware attacks before they can do damage.
https://learn.microsoft.com/en-us/defender-endpoint/attack-surface-reduction-rules-reference
2. Device Isolation
If you spot a compromised device, Device Isolation allows you to cut it off from the network remotely to stop any malware from spreading. This is a game-changer in the event of an attack.
Use Case: Let’s say a laptop starts acting strangely and showing signs of a ransomware attack. You can isolate it immediately, stopping the attack in its tracks while your team investigates.
3. Tamper Protection
Tamper Protection prevents unauthorized changes to key security settings, keeping your protections intact. This feature blocks both malware and unauthorized users from disabling critical protections like real-time antivirus, ensuring your defences stay in place.
Benefits:
- Stops attackers from turning off security settings like antivirus or firewall protection.
- Ensures consistent protection by preventing accidental or malicious changes.
- Peace of mind knowing that your security settings are locked down.
Use Case: For example, if ransomware tries to disable antivirus protections, Tamper Protection steps in to block these changes, keeping your devices safe
4. Device Grouping
Grouping devices makes it easy to manage your security. You can organize devices by department, risk level, or role and apply specific policies to each group.
Use Case: You can group all devices in the finance department under stricter security policies since they handle sensitive financial data, while leaving general office devices under standard security measures.
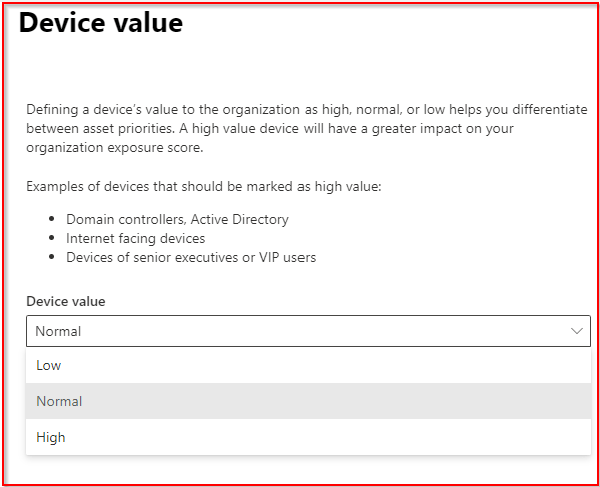
5. Marking Devices as High Priority
This feature is super handy for ensuring that critical devices get the attention they need. Marking a device as high priority means it gets monitored more closely, and any security alerts for that device are flagged for faster responses.
Use Case: Marking the CEO’s laptop or key company servers as high priority means any security incidents related to those devices will be treated with extra urgency.
5. Threat and Vulnerability Management (TVM)
TVM is always on the lookout for vulnerabilities on your devices and servers. It ranks them based on how risky they are and gives you recommendations for how to fix them, all while helping you improve your Secure Score.
Final Thoughts
Microsoft Defender for Endpoint is a lot more than just antivirus software—it’s a full security platform that helps you stay on top of cyber threats. Whether you’re securing laptops, mobile devices, or critical servers, Defender gives you the tools you need to manage and monitor your entire environment.
With advanced features like Device Isolation, Threat and Vulnerability Management, and Attack Surface Reduction, Defender for Endpoint helps you take a proactive approach to security, ensuring your organization stays protected from modern cyber threats.